The adorable mess header

The adorable mess header

Saturday, November 30, 2013

Life Cycles and Project Work

I have the amazing privilege of working for a charter school that utilizes project-based learning as one of their core values.  Each quarter we get the chance to work on one major project that integrates elements of the the North Carolina Essential Standards and Math and Language Common Core standards to produce high quality work that is both meaningful to the student and that teaches them the skills of a twenty-first century learner.  I don't care who you are, high-stakes testing doesn't even hold a candle to the skills and abilities that we get a chance to cultivate in our classrooms on a daily basis through our project work.  My kids LOVE it, they are genuinely curious and it perpetuates natural curiosity and inquiry because of the level of student interest.

I could ramble on for DAYS about how much I enjoy our quarter long projects, but instead I thought I would share with you some of the work that we did over the quarter and show you the work that displayed at our project celebration.

We launched our trip with an inquiry based trip to the Museum of Life and Science in Durham.  There, the students had the opportunity to visit the butterfly house where they participated in a workshop that focused on the life cycle of the butterfly.  From that visit we built our understanding of life cycles based on the knowledge that we had gained from our life cycle experience at the Museum of Life and Science.

Upon our return we began to brainstorm how we could turn our classroom into a museum about life cycles by the end of the project.  We thought about the necessary elements of a museum and the things we might need to include in our room and in our studies to make sure that we were able to create a museum of our learning in our classroom.  Now, I had already mapped out this project before we brainstormed our ideas, thinking ahead about what ideas they might develop.  After their initial ideas were collected, I modified some of my plans to meet the student interests, while continuing to focus upon the necessary standards that I needed to cover with this unit.

Knowing that our museum would be focused on life cycles, we launched into a study of various animal life cycles.  We tried to focus on a read aloud and a diagram of the life cycle that students had a chance to make after learning different facts about animal life cycle.  We studied the life cycle of the honey bee, lady bug, chicken, turtle and frog.  We also wanted to make sure that the students knew the expectations for the quality of their work, so we began by introducing our beautiful work anchor chart!


After that, we moved straight into our life cycle study.  Here are the books we read and the crafts that we used to display our learning:


Butterfly

We began with a review of the life cycle of a butterfly.  We read From Caterpillar to Butterfly by Deborah Heiligman and created a paper plate craft to display our learning.


Ladybug

Considering the fact that the life cycle of a ladybug is very similar to that of a butterfly, we moved next into the study of the ladybug and read A Ladybug's Life by John Himmelman.


For our craft inspiration Pinterest led us to the blog, Lucky in Learning.  Check out her craft suggestion below! 

Chicken
The chicken life cycle was our next stop in our study of life cycles.  The Magic School Bus Cracked a Yolk is a great kick off to the study of this life cycle.  For our read aloud, we studied From Egg to Chicken by Anita Ganeri.


The anchor chart:


Our hands-on craft:


Observation Journals: 

Great learning happens when students get a chance to observe and experience a life cycle in person.  In order to provide this experience for our students, we decided to order Painted Lady butterflies for our classroom.  Students kept an observation journal during the butterflies stay in our classroom. We reviewed how to make good observations and watched Brain Pop Jr's video on making observations.  Check out our anchor chart and our observation journals!


You can find a free download of the observation guide on my Teacher's Pay Teachers page!

Project Celebration

At the end of our projects, we always have a project celebration. We ended up putting on a Life Cycle Museum and this is the display of some of the great life cycle projects that we did!


We also made large life cycle sculptures of the butterfly's life cycle.  Here are two of our sculptures:


Other Educational Components:  
In addition to our life cycle displays, we also did scientific drawings of butterflies that we identified from our slides, we did a venn diagram comparing different animal life cycles and we created display boards that displayed facts and depicted each animal at different stages in its life cycle.

Monday, November 11, 2013

Married and Bright: Inspiration from Minted

It is all I can do to control my Christmas craze by early November.  My poor family and friends know that by Thanksgiving I have done all I can do to control my need to listen to Christmas music, take in the holiday merriment and bask in the joy that is Christmas.  I got a little ahead of myself this year...I promise I was only in the middle of planning my wedding when I noticed this lovely little contest from Minted, featuring holiday cards.  I tried, I resisted, but I just couldn't help myself.  Anticipating our first Christmas together in 2014, I went ahead and themed my board "Married and Bright."  I hope that you enjoy!
Merry and Bright by Katie, see more unique stationery
Merry and Bright board by Katie. See more unique stationery

Sunday, September 22, 2013

Discounts and Perks EVERY Teacher Should Know


So, you're like most teachers out there...broke and the availability of supplies, read alouds and technology never seems to be sufficient.  Times are tough, but you're dedicated and YOU want to make sure that your students have what they need to succeed, which is why you're willing to sacrifice what little money you have to ensure that your classroom is an inviting, engaging place.  

Thankfully, there are many stores out there that also appreciate your willingness to serve in the classroom and with a little questioning you'll find that many places provide a discount or a perk to teachers.  Here is a list of stores that I've run across within the last few years that offer discounts or rewards to teachers.  I've already listed some retail stores that offer teacher discounts in an earlier post. Check these out, along with the discounts at retail clothing stores, and enjoy saving a little green along the way.  Please note that I was in no way asked to advertise these stores.  These are stores I've personally found to provide teacher discounts. :)


JoAnn Fabric and Craft Store - 15% off every day purchases and 25% off on educator appreciation days. 

Barnes and Noble- 20% off of your in-store purchases.  The only downside is that it doesn't work for coffee. :(

Staples- 5% back in rewards, along with free online shipping and special offers.  

Office Max- Office Max offers the Max Perks program, which gives you $10 for every $75 you spend. 

Michael's - 15% off in the store with your Teacher I.D. Sometimes stores will take any document that proves you work at a school if you forget your I.D. 

A.C. Moore- 15% off in store if you have your ID.  They don't have anything advertising a discount on their website, but the stores I've been to usually offer a discount. 

Apple Store- The Apple Education Store offers a variety of discounts for schools and teachers when you find your school on their website and order through the website.  

Adobe- Software discounts are available for teachers.  The software discounts vary, depending on the product.  They are currently offering the Creative Cloud to Teachers for $20 a month.  (Photoshop, Elements, Illustrator and more...)

Scholastic- Now called the Reading Club, Scholastic offers teacher bonus points on parent orders using your access code.  Teachers can use their bonus points to purchase books from Scholastic's website.  They do a GREAT job of providing special offers to help you rack up those points!

The Container Store- They offer the "Organized Teacher Discount" which advertises discounts to be shared with teachers throughout the year.  

Finally- be sure to ASK EVERY STORE if they offer teacher discounts.  Many places will be happy to throw in a discount if you have your I.D.  There is absolutely no harm in asking! 

Happy Saving,
Katie

Wednesday, September 18, 2013

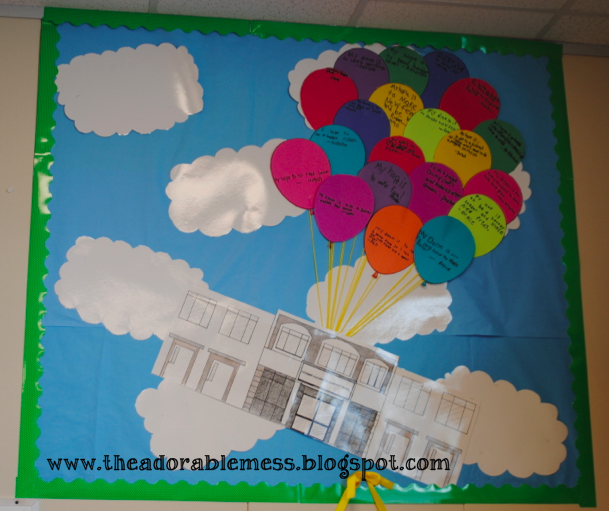
Our "UP" inspired Hopes and Dreams

Follow my blog with Bloglovin

I have to begin my saying that I work at THE BEST school.  I truly, deeply, love my job and the team of teachers that I work with.  Working at a charter school, in my opinion (and I know there are others out there who disagree, which is fine), gives you the best of both worlds.  We get kids from all walks of life, but it makes a HUGE difference when families choose to attend your school, rather than being forced to attend.  At our charter school, we not only have an academic curriculum, but we also have a social curriculum which is called Responsive Classroom.  

Responsive Classroom has you use the first week of school to really formulate and think about what the students' hopes and dreams are for the year.  We sit down and really think about all of the things that we, individually and communally, would like to see happen for ourselves and for our classroom.  It takes a bit of stretching to help them understand what the possibilities can be, but after awhile they start to roll with the idea.  We then used our hopes and dreams to guide the discussion for what rules we would need in our classroom to make it possible for everyone (including the teacher) to reach their hope or dream for the year.  

Once the hopes and dreams are created, the purpose is to create a beautiful display that will stay up in the classroom for the ENTIRE year.  We'll reference it regularly to help us remember EXACTLY what we hope to achieve this year.  Which, led me to some detailed brainstorming, because there are FEW things I like enough to leave up in my classroom ALL YEAR LONG and that the kids would find inspiring. 

I spent quite a bit of time thinking about how I wanted to display our hopes and dreams.  Now, for those of you who know me...and for those of you who are just now getting to know me through this post, you'll know that I deeply love the movie "UP" from Disney Pixar.  I mean, talk about and hope and a dream...that guy had it going.  So, drawing from my love of UP, I had the students write their hopes and dreams on a balloon template, which I copied in many different colors and then we put them up in the sky with some beautiful clouds to showcase the bright colors.  However, I was left with the decision of what to put on the bottom of the balloons.  In the movie there was a house attached to the bottom, but that wasn't at all applicable.  I mean, this applied specifically to our classroom but drawing a "classroom" was tough to conceptualize in a bulletin board display.  Knowing that our hopes and dreams applied to all areas of school, though, helped me out and I ended up drawing a very tiny display of our school to put up in the room.  

Now, I need you to know that our laminator has been on the fritz and my quote "Never give UP on your dreams" has yet to be added to the display, but I've been DYING to share it with you.  So, here it is.  Drum roll please...........................................................................................................


I hope and dream that you've been inspired!  Thanks for stopping in!

Happy Dreaming,
Katie

Monday, September 16, 2013

FREEBIES on Teachers Pay Teachers

Follow my blog with Bloglovin

Happy Monday!  :)

I have to start off by stating that this Monday was FAR better than last Monday.  Last week someone stole my "teacher bag" which also had some very important documents in it and it was a headache notifying all of the necessary agencies.  I mean, who takes a teacher bag full of student work, a wedding planning binder and a children's book?!?!  Needless to say the bag has not turned up. :(

In order to celebrate this Monday being much better than last week, I thought I'd share some work that I put on Teachers Pay Teachers last week.  At my school we implement Project-Based Learning and my second graders are in the middle of doing a life cycles project.  We launched the project by taking a visit to the Durham Museum of Life and Science to visit their Butterfly Conservatory.  Talk about neat!  We saw lots of butterflies, did an entire workshop on butterfly life cycles and had the chance to see some butterfly eggs.  Check out the pictures below from our trip inside the butterfly conservatory.


Now that we've launched our project we are off and away with working on learning about life cycles.  Our main focus is butterflies, while envisioning that our final product will be an entire Life Cycles Museum that we put together as a class.  They came back with some GREAT ideas after our visit to the museum and noticed details that I had glanced over that would be wonderful additions to our final product, which will unveil itself sometime in October.

Seeing as we're focused on butterflies and the fact that they are due to arrive in our room any day now, I've put together a free download on Teachers Pay Teachers that is a life cycle observation journal.  We spent today talking about how to make good observations, so we're ready to use our journals when the caterpillars arrive. There are two journal pages, a black and white cover page and a color cover page, which is shown below!


Also, to keep your week a bit more organized, I have a quick download for those of you who like to stay on top of your daily "To-Do" items.  To download you can click here or you can click on the picture.


Have a Joyful Week!
Katie

Wednesday, September 4, 2013

Geocaching 101


With the beautiful fall weather just around the corner,  I thought I'd take a moment today to post about one of my favorite outdoor activities: geocaching!  

I know, you're probably thinking "what on earth is a post like this doing on a blog that features shopping, teaching and crafting?"  Well, the simple answer is that I'm about finding things that make life interesting and meaningful.  This was an activity that my now fiancĂ© and I ran across a few years back and we've absolutely enjoyed doing it. 


So, you're probably wondering, what is geocaching?  Well, the simple answer is that it is an outdoor scavenger hunt...kind of.  It requires the use of a GPS device and access to an online network of hidden caches.


What am I looking for? 

The definition of a cache, per Merriam-Webster, is "a hiding place especially for concealing and preserving provisions or implements."  Caches have often been used during war to store or hide military provisions and troops were given a GPS location to find their cache.  A geocache is a hidden container that holds a log and sometimes items.  The items can be of worth, though most caches are only the log AND the rule of thumb with geocaching is that if you take something, you replace it with another item of equal or greater value.  

Why geocache? 

The answer is simple, it helps you explore new places.  There is an entire network of geocaches in the United States and overseas.  They provide you with a purpose for being outside and in a variety of settings. Check out the map below to see how many caches exist!

(Photo credit is http://www.geocaching.com/map/#?ll=47.04018,-36.73828&z=3)


What kinds of tools will I need? 

You'll want to make sure you have a good GPS device.  If you have a smartphone, you can always download the app from your app store.  I HIGHLY recommend spending the $10 for the actual app if this is something you plan to do long term.  The $10 app gives you access to online logs, pictures and clues.  We've found that it is worth the money.  You'll also need a good pair of shoes, keen eyes and anything that will prepare your for the elements of the day.  Caching can take anywhere from 10 minutes to a few hours, depending on the cache.  

Here are the steps for caching: 

1. Go online or on your smart and register for a geocaching account.  It is free and super easy.  


2. Use the Geocaching website to help you find caches in your area.  If you have a smartphone, the app will help you find nearby geocaches.  


3. Using your device you will navigate to the area.  Most devices will get you within about 16-30 feet of your cache.  From there, it is all about using your brain and your observations to help you find the cache.  


4. Once you find the cache, sign the log and return the cache to the exact same spot that you found it in.   If you notice that the cache needs some attention, notify the owner of the cache.  


4. Once you find the cache, log it on your online account.  You have to be logged into the website to do this.  The log is located under the drop down box that says "Play" and you will need the GC code from your cache.  

5. Find another!


Here are some photos finding a recent geocache.  This particular geocache took us two different trips to actually find.  The name of the cache is what eventually led us to the clue.  The cache was titled "A Branch on George's Creek."  Kudos to my man for finding this one!

The "branch" 


The clue was "clean cut." 


This is a microcache.  They are absolutely tiny.  Caches can range in size from an ammo box to something as small as a tiny magnet.  


Here is an example of a log that you would sign.  It was rolled up neatly inside of the container.  


We obviously weren't the first to find this cache.  Others had been there before us, and I'm sure others will come after!


Putting the cache back in its original spot, unharmed and unchanged for the next geocachers.  :)


Happy caching!
Katie