The adorable mess header

Showing posts with label adorable mess. Show all posts
Showing posts with label adorable mess. Show all posts
Monday, November 11, 2013
Married and Bright: Inspiration from Minted

Wednesday, September 18, 2013
Our "UP" inspired Hopes and Dreams
Follow my blog with Bloglovin

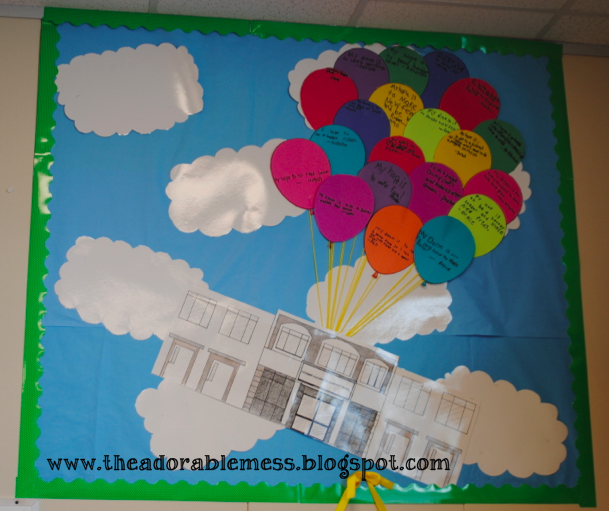
I have to begin my saying that I work at THE BEST school. I truly, deeply, love my job and the team of teachers that I work with. Working at a charter school, in my opinion (and I know there are others out there who disagree, which is fine), gives you the best of both worlds. We get kids from all walks of life, but it makes a HUGE difference when families choose to attend your school, rather than being forced to attend. At our charter school, we not only have an academic curriculum, but we also have a social curriculum which is called Responsive Classroom.
Responsive Classroom has you use the first week of school to really formulate and think about what the students' hopes and dreams are for the year. We sit down and really think about all of the things that we, individually and communally, would like to see happen for ourselves and for our classroom. It takes a bit of stretching to help them understand what the possibilities can be, but after awhile they start to roll with the idea. We then used our hopes and dreams to guide the discussion for what rules we would need in our classroom to make it possible for everyone (including the teacher) to reach their hope or dream for the year.
Once the hopes and dreams are created, the purpose is to create a beautiful display that will stay up in the classroom for the ENTIRE year. We'll reference it regularly to help us remember EXACTLY what we hope to achieve this year. Which, led me to some detailed brainstorming, because there are FEW things I like enough to leave up in my classroom ALL YEAR LONG and that the kids would find inspiring.
I spent quite a bit of time thinking about how I wanted to display our hopes and dreams. Now, for those of you who know me...and for those of you who are just now getting to know me through this post, you'll know that I deeply love the movie "UP" from Disney Pixar. I mean, talk about and hope and a dream...that guy had it going. So, drawing from my love of UP, I had the students write their hopes and dreams on a balloon template, which I copied in many different colors and then we put them up in the sky with some beautiful clouds to showcase the bright colors. However, I was left with the decision of what to put on the bottom of the balloons. In the movie there was a house attached to the bottom, but that wasn't at all applicable. I mean, this applied specifically to our classroom but drawing a "classroom" was tough to conceptualize in a bulletin board display. Knowing that our hopes and dreams applied to all areas of school, though, helped me out and I ended up drawing a very tiny display of our school to put up in the room.
Now, I need you to know that our laminator has been on the fritz and my quote "Never give UP on your dreams" has yet to be added to the display, but I've been DYING to share it with you. So, here it is. Drum roll please...........................................................................................................

I hope and dream that you've been inspired! Thanks for stopping in!
Happy Dreaming,
Katie

I have to begin my saying that I work at THE BEST school. I truly, deeply, love my job and the team of teachers that I work with. Working at a charter school, in my opinion (and I know there are others out there who disagree, which is fine), gives you the best of both worlds. We get kids from all walks of life, but it makes a HUGE difference when families choose to attend your school, rather than being forced to attend. At our charter school, we not only have an academic curriculum, but we also have a social curriculum which is called Responsive Classroom.
Responsive Classroom has you use the first week of school to really formulate and think about what the students' hopes and dreams are for the year. We sit down and really think about all of the things that we, individually and communally, would like to see happen for ourselves and for our classroom. It takes a bit of stretching to help them understand what the possibilities can be, but after awhile they start to roll with the idea. We then used our hopes and dreams to guide the discussion for what rules we would need in our classroom to make it possible for everyone (including the teacher) to reach their hope or dream for the year.
Once the hopes and dreams are created, the purpose is to create a beautiful display that will stay up in the classroom for the ENTIRE year. We'll reference it regularly to help us remember EXACTLY what we hope to achieve this year. Which, led me to some detailed brainstorming, because there are FEW things I like enough to leave up in my classroom ALL YEAR LONG and that the kids would find inspiring.
I spent quite a bit of time thinking about how I wanted to display our hopes and dreams. Now, for those of you who know me...and for those of you who are just now getting to know me through this post, you'll know that I deeply love the movie "UP" from Disney Pixar. I mean, talk about and hope and a dream...that guy had it going. So, drawing from my love of UP, I had the students write their hopes and dreams on a balloon template, which I copied in many different colors and then we put them up in the sky with some beautiful clouds to showcase the bright colors. However, I was left with the decision of what to put on the bottom of the balloons. In the movie there was a house attached to the bottom, but that wasn't at all applicable. I mean, this applied specifically to our classroom but drawing a "classroom" was tough to conceptualize in a bulletin board display. Knowing that our hopes and dreams applied to all areas of school, though, helped me out and I ended up drawing a very tiny display of our school to put up in the room.
Now, I need you to know that our laminator has been on the fritz and my quote "Never give UP on your dreams" has yet to be added to the display, but I've been DYING to share it with you. So, here it is. Drum roll please...........................................................................................................


I hope and dream that you've been inspired! Thanks for stopping in!
Happy Dreaming,
Katie
Sunday, May 19, 2013
DIY Memory Board

Do it yourself crafts are
definitely my favorite lazy weekend projects...especially when I can make
something that I love for WAY cheaper than I could buy it or find it.
I've always been the particular sort that can find what I "sort
of" want...but never what I exactly envision, which often leads me to
making it myself. I've been looking for a cute chevron memory board to
hang it my classroom and wanted to share the fruits of my labor with you this
afternoon. This is a SUPER easy project that can be completed in an
afternoon's time and will be ready to hang in no time. I hope you enjoy!
Materials:
- 1 medium size canvas OR 3-4
4"x4" cork boards
- Enough fabric to cover the area of
your board and leave approximately an inch border around the edge
- Quilt batting
- Glue gun
- Stapler
- Ribbon
- Scissors
Constructing your Board
Begin by deciding the size
of your board. I decided to use 3 square cork boards due to the size of
the fabric that I had purchased. I laid them out on top of my fabric,
leaving approximately 1-1.5" of fabric as a border. This
is important because you'll need to be able to fold the fabric over onto the
back of the board.

Once you've decided on your size, glue your boards together. If
you are using a photo canvas, go ahead and skip down to the section with quilt
batting.

Quilt Batting
Using the quilt batting,
place your board or canvas on top to make sure that you have enough batting to
cover the entire board. Using a pair of scissors, cut the batting so that
it is exactly even with the edge of your board. After this step, place
the quilt batting and the board on top of the fabric, leaving about a 1.5"
margin around the edge of the fabric. I recommend making sure you have 2 layers
of quilt batting in between the board and the fabric.

Fabric
Using a regular stapler,
fold the fabric over onto the back of the board and staple it securely. It
is imperative that you pull the fabric as tightly as possible or else the
fabric will sag upon completion.

Staple around the entire board.

When you finish, turn the board over and make sure that your fabric is smooth. If you notice that the fabric is not smooth, remove the necessary staples and staple again until the fabric is even and smooth.

You can staple ribbon to
the back to hang it, or you can leave it as is. I also like to make
boards with criss cross ribbons on the front to hold pictures. It's up to
you! :)

Finished Product:


Happy Crafting!
Katie
Subscribe to:
Posts
(
Atom
)